Sometimes, there is a shape or vector graphic from a popular stock photo site that I’d like to edit and use in PowerPoint. And editing the graphic in PowerPoint, (for me anyway), would be faster than editing the graphic in Illustrator–especially considering the file is going to end up in PowerPoint eventually anyway.
Well, lucky for us, there is an easy way to convert most illustrator graphics into editable PowerPoint shapes, or rather what is known as a “Microsoft Office Drawing Object.”
Step 1: Export Graphic from Illustrator
The first step is to export the graphic from Illustrator, but you have to export the graphic as a very specific format: an Enhanced Metafile (EMF).
An EMF file is somewhat similar to SVG files…sort of. I’m not going to get too technical here, but just know that an EMF file can contain both vector graphics as well as bitmap components. Now, if you don’t know what the later is don’t worry about it. When you encounter it in PowerPoint you’ll know because that component will not be editable as a shape, but as a picture. Only vector parts of an EMF will be editable as a PowerPoint shape.
To Export from Illustrator:
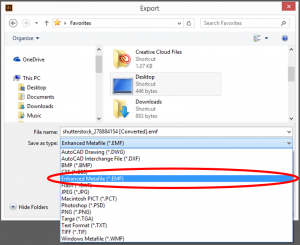
- Go to your File Menu, and click on Export…
- Next, from the Save as Type Option Box, select Enhanced Metafile (*.EMF).
- Click Save
And that’s really all there is to do from Illustrator. So even if you have absolutely no Illustrator skills, just the ability to buy a vector graphic from a stock photo site and an Adobe Creative Cloud subscription (if you are like me you already have subscriptions to both), this is all you need to know for now in Illustrator.
Step 2: Insert EMF file Into PowerPoint
For the next stage of steps, we’ll be working entirely in PowerPoint. I’ll be demonstrating this using the recently released PowerPoint 2016, but you can a number of earlier versions of PowerPoint as well. As for getting our EMF file into PowerPoint, we’re going to first need to insert that file as a Picture, which if you are reading this…you probably already know how to do. But to be thorough, I’ve included the step below anyway.
To Insert a Picture into PowerPoint:
- Click on the Insert Tab, and click or tap the option labeled “Pictures.”
That will open the Insert Picture dialog box. - Navigate to where you saved your EMF file, select the EMF, and click on Insert.
PowerPoint will then insert your EMF file as a PowerPoint picture. With the picture selected, you should see the Picture Tools Format tab appear in the Ribbon (PowerPoint 2010 or later).
Step 3: Covert the Picture to a Microsoft Office Drawing Object
Now with our EMF file in PowerPoint, we’re ready to covert our EMF to a Microsoft Office Drawing Object. To convert our picture…this is NOT an intuitive process by any means, but once you learn this it will change you life! I promise! The conversion process is as simple as ungrouping the picture. I know, that make no sense whatsoever! But trust me, try it!
To Ungroup An EMF Picture:
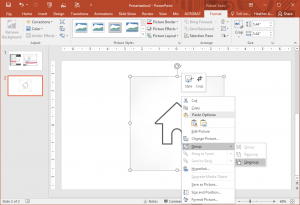
- Right-click on the picture, hover your mouse over the option Group, and select Ungroup.

A warning dialog box will appear, asking the following “This is an imported picture, not a group. Do you want to convert it to a Microsoft Office drawing object?” - Click or tap Yes.
You now have a grouped object. If you like, you can continue to ungroup the object to separate out all pieces of the graphic. If the EMF file contain both vector and bitmap components, you’ll be able to tell by what shows on the Ribbon. In the picture below, you can see that this particular stock image contain a vector of a house and a gradient background image.
What’s great here is that now you can pick and choose which part of the graphic you want to keep. For example, if I just want to keep the house and ditch the gradient (picture and not as editable) background I can simply select the background portion and press delete on my keyboard. Then all I am left with is a PowerPoint shape of a house that I can edit and recolor as I so desire. Pretty cool, huh?


